
1. Prerequisites
- You must have access to the Azure snapshot resource.
- OSFMount installed on your machine.
- Administrator privileges to run PowerShell scripts.
2. Download Snapshot from Azure
- Open the Azure Portal and navigate to the snapshot container and select a snapshot.
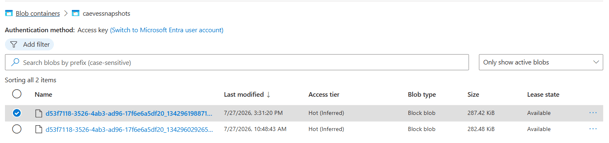
- Click Generate SAS on the top menu.
- Set the expiry time as needed (default: 3600 seconds / 1 hour).
- Click Generate SAS token and URL.
- Copy the generated SAS URL.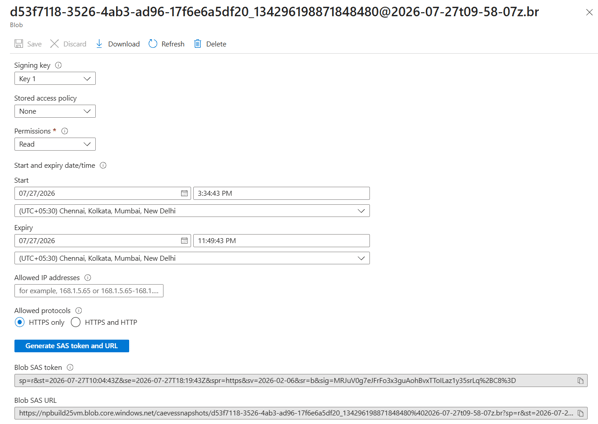
- Download Snapshot
- Paste the SAS URL into a web browser; the snapshot download will start automatically.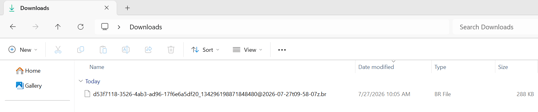
- Create a folder: C:\TestSnap
- Copy the snapshot file into this folder
- Rename the snapshot file to: snapshot.br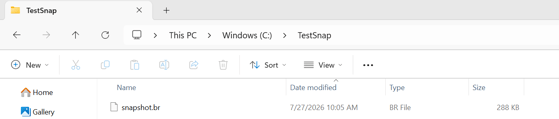
- Decompress Snapshot
- Download Brotli from: https://github.com/google/brotli/releases
- Use: Brotli-x64-windows-static.zip
- Extract and place brotli.exe in C:\Brotli
- Open Command Prompt and Run: C:\Brotli\brotli.exe -d snapshot.br
- Snapshot file is decompressed successfully.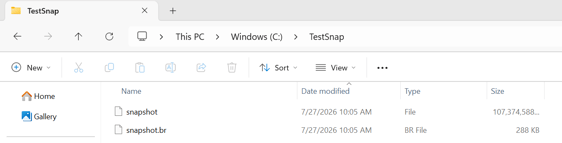
3. Install and Mount Snapshot Using OSFMount
- Download OSFMount from https://www.osforensics.com/tools/mount-disk-images.html.

- Run the installer and follow the prompts to install OSFMount.

- Launch OSFMount.
- Click Mount New.

- Select the downloaded snapshot file.

- If multiple partitions appear, select the one containing your data.
- Assign a drive letter (e.g., E:).
- Check Read-only drive to avoid modifying the snapshot.


- Click OK to mount the image.
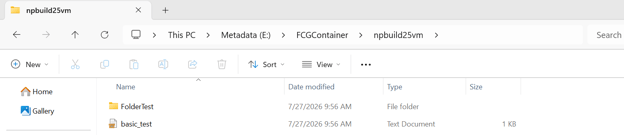
- Open File Explorer to verify the new drive is mounted successfully.

4. File Recovery Script Configuration
- Open PowerShell as Administrator.
- Save the recovery script as Recover_File_From_Snapshot.ps1.
- Update the configuration variables in the script:
$MountedDrive → Specify the OSFMount drive letter where the snapshot is mounted (e.g., E:).
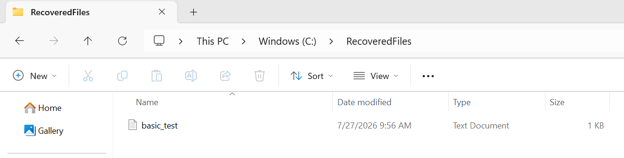
$DestinationDir → Specify the folder path where recovered files will be copied (e.g., C:\RecoveredFiles).
$BaseDir → Set the base directory inside the mounted snapshot where the search should begin (e.g., "$MountedDrive\FCGContainer\testalias").
$FileName → Provide the name or pattern of the file you want to recover (e.g., "test_text.txt"). - Run the script:
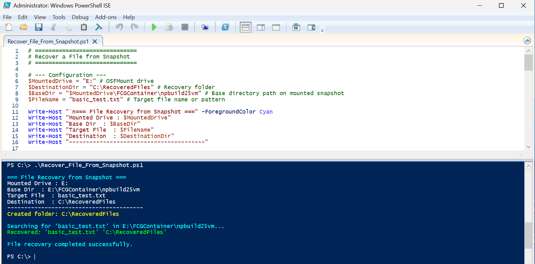
.\Recover_File_From_Snapshot.ps1 - Upon successful execution, your recovered file will be available at the destination path (e.g., C:\RecoveredFiles).
5. PowerShell Script – Recover File
# ==============================
# Recover a File from Snapshot
# ==============================

# --- Configuration ---
$MountedDrive = "E:" # OSFMount drive
$DestinationDir = "C:\RecoveredFiles" # Recovery folder
$BaseDir = "$MountedDrive\FCGContainer\npbuild25vm" # Base directory path on mounted snapshot
$FileName = "basic_test.txt" # Target file name or pattern

Write-Host "`n=== File Recovery from Snapshot ===" -ForegroundColor Cyan
Write-Host "Mounted Drive : $MountedDrive"
Write-Host "Base Dir  : $BaseDir"
Write-Host "Target File  : $FileName"
Write-Host "Destination  : $DestinationDir"
Write-Host "----------------------------------------"

# --- Ensure destination folder exists ---
if (!(Test-Path $DestinationDir)) {
try {
New-Item -Path $DestinationDir -ItemType Directory -ErrorAction Stop | Out-Null
Write-Host "Created folder: $DestinationDir" -ForegroundColor Yellow
 } catch {
Write-Host "Error creating folder: $($_.Exception.Message)" -ForegroundColor Red
exit
 }
}

# --- Validate base directory ---
if (!(Test-Path $BaseDir)) {
Write-Host "Base directory not found: $BaseDir" -ForegroundColor Red
exit
}

# --- Search for file ---
Write-Host "`nSearching for '$FileName' in $BaseDir..." -ForegroundColor Cyan
try {
$Matches = Get-ChildItem -Path "$BaseDir\" -Recurse -ErrorAction SilentlyContinue |
Where-Object { $_.Name -eq $FileName }
} catch {
Write-Host "Search error: $($_.Exception.Message)" -ForegroundColor Red
exit
}

# --- Copy / Recover file ---
$Recovered = $false  # Track if any file was successfully recovered

if ($Matches) {
 foreach ($File in $Matches) {
$Dest = Join-Path $DestinationDir $File.Name
try {
Copy-Item -LiteralPath $File.FullName -Destination $Dest -Force -ErrorAction Stop
Write-Host "Recovered: '$($File.Name)' '$DestinationDir'" -ForegroundColor Green
$Recovered = $true
} catch {
 Write-Host "Copy failed for '$($File.Name)': $($_.Exception.Message)" -ForegroundColor Yellow
 try {
 $srcLong = "\\?\$([System.IO.Path]::GetFullPath($File.FullName))"
 $dstLong = "\\?\$([System.IO.Path]::GetFullPath($Dest))"
 [System.IO.File]::Copy($srcLong, $dstLong, $true)
 Write-Host "Recovered (long-path): '$($File.Name)' → '$DestinationDir'" -ForegroundColor Green
 $Recovered = $true
 } catch {
 Write-Host "Final copy failed for '$($File.Name)': $($_.Exception.Message)" -ForegroundColor Red
 }
 }
 }
} else {
  Write-Host "No file found matching '$FileName' in snapshot base directory ($BaseDir)." -ForegroundColor Yellow
}

# --- Completion Summary ---
if ($Recovered) {
    Write-Host "`nFile recovery completed successfully." -ForegroundColor Cyan
} else {
    Write-Host "`nFile recovery failed — no files were recovered." -ForegroundColor Yellow
}
6. Note
- To avoid PowerShell script execution restrictions, you may need to set the execution policy temporarily:
Set-ExecutionPolicy -Scope Process -ExecutionPolicy Bypass
- Always mount the snapshot as read-only to avoid accidental changes.
- robocopy is used for robust and recursive folder copying preserving all metadata.
- If you encounter any permission issues, run PowerShell as Administrator