
1. Prerequisites
Before starting, ensure you have the following:
1.1 System Requirements
- Operating System: Install a Windows 2025/2022 Server Standard or Datacenter Desktop Experience
- Storage Configuration:
When provisioning your data disk, allocate space using the following percentages:
| Volume | Description | Percentage |
|---|---|---|
| Metadata (F:) | Used for storing metadata information | 10% |
| Cache (G:) | Used for caching operations | 100% |
| Snapshot | Used for snapshot storage | 90% |
Example: Disk Space Allocation Based on Actual Capacity
Disk 1 (Fixed, 1024 GB):
Metadata (F:) → 10% of 1024 GB = 102.4 GB
Snapshots (unlabelled) → 90% of 1024 GB = 920.7 GB
Disk 2 (Slider, 512 GB):
Cache (G:) → 100% of 512 GB = 512 GB (This allocation corresponds to the 40% cache rule when considering the combined total capacity of 1536 GB.)
Steps to Partition Disks in Windows
- Press Windows + X and choose Disk Management.
- Locate Disk 1 (Fixed) and Disk 2 (Slider).
- For Disk 1:
- Create a partition for F: Metadata (102.4 GB).
- Allocate the remaining space (~920.7 GB) for Snapshots.
- For Disk 2:
- Create a partition for G: Cache (512 GB).
- Assign drive letters and format each volume (use NTFS).
Final Partition Layout
- F: Metadata Volume - 102.4 GB (10% of Fixed disk)
- G: Cache Volume - 512 GB (100% of Slider disk, equivalent to ~40% of total capacity)
- Snapshots Volume (unlabelled) - 920.7 GB (remaining 90% of Fixed disk, equivalent to ~50% of total capacity)
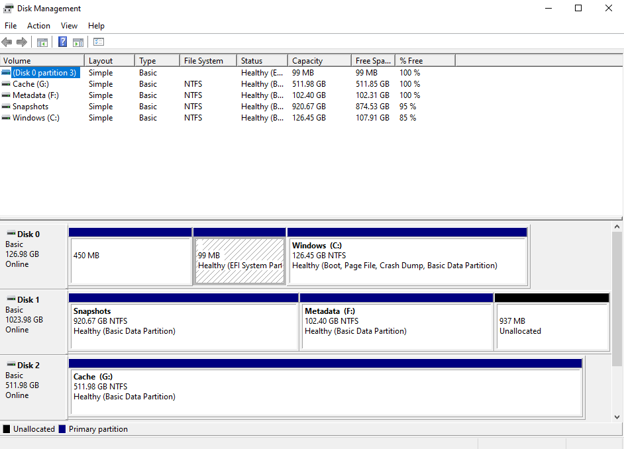
This ensures optimal utilization of available storage space based on system requirements.
1.2 Software Requirements
Before installing CAEVES, download and install the following software components:
Step 1: Download and Install Required Runtimes
- ASP.NET Core Runtime 8.0.26 - Click Here
- .NET Desktop Runtime 8.0.26 - Click Here
- .NET Runtime 8.0.26 - Click Here
- Microsoft Visual C++ Redistributable - Click Here
Step 2: Verify Installation
Open Command Prompt and run: dotnet --list-runtimes
Run this command to list installed Visual C++ Redistributable:
wmic product get name,version | findstr "Visual C++"
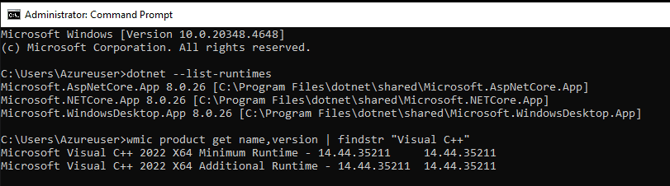
Ensure all runtimes are installed successfully before launching the CAEVES installer.
Step 3: Access Azure Portal
Ensure you have access to the Azure Portal for storage provisioning and configuration required during CAEVES setup.
Log into the Azure Portal
2. Subscribe to CAEVES Intelligent Deep Storage
Before provisioning storage resources, you must subscribe to CAEVES Intelligent Deep Storage through the Azure Marketplace. This enables integration between your Azure subscription and the CAEVES deployment.
Steps:
-
Log into the Azure Portal
-
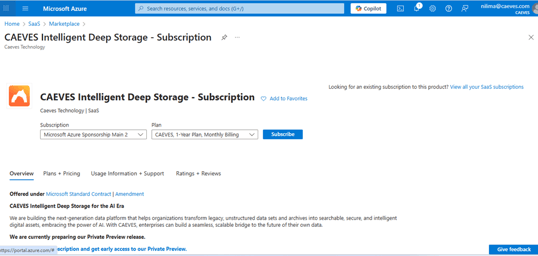
Navigate to Marketplace → CAEVES Intelligent Deep Storage – Subscription.
-
Select your Azure Subscription from the dropdown menu.
-
Choose your preferred Plan, for example:
-
CAEVES – 1-Year Plan, Monthly Billing
-
-
Click Next to proceed to Project Details.
-
Under Project Details, provide the following:
-
Resource Group → Select an existing group or create a new one.
-
SaaS Details → Enter subscription name and region if prompted.

-
-
Click Next to review your configuration.
-
Review all details carefully.

9. Click Subscribe to complete the subscription process.
2.1 Configure the CAEVES SaaS Account
Once the subscription is complete, you must configure your CAEVES SaaS account to activate the deployment.
-
After subscribing, you will receive an email titled “Configure your new CAEVES Intelligent Deep Storage - Subscription SaaS account.”
-
Click Configure account now in the email or from the Azure Portal to proceed to the CAEVES Publisher Configuration Page.

-
You will be redirected outside the Azure Portal to the CAEVES Configuration Portal.
- On the Subscription Details page, review the pre-populated information and
Enter the following required details:
-
Company Name
-
Contact Email Address
-
Estimated Capacity (in TB)
-
- Once all details are filled in, click Activate to complete the configuration process.

- After successful activation, click Go to Subscription List to view your active CAEVES subscriptions.


Important:
-
The subscription will not be fully activated until you configure your CAEVES account.
-
If configuration is not completed within 30 days, the SaaS subscription will be automatically deactivated.
3. Provision Required Storage Resources
Before deploying CAEVES, create the following resources in your on-premises storage environment
3.1 Create Storage Account
-
Log into your Azure Portal
-
Navigate to Storage Accounts → Create.
-
Configure the storage account:
-
Name: caevesnptestdemo
-
Deployment model: Select your resource group
-
Performance: Standard (or Premium if needed)
-
Replication: Locally redundant (LRS) recommended for on-premises
-
Access tier: Hot
-
-
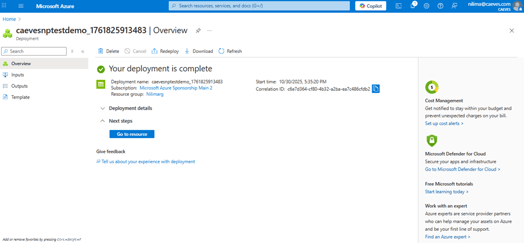
Click Review + Create → Create.
-
After creation, go to Access Keys and note down:
-
Storage Endpoint URL (e.g., https://caevesnptestdemo.blob.core.windows.net)
-
Access Key / Secret Key
-
Connection String
-
These details will be used in CAEVES configuration.
3.2 Create Container
Inside the storage account (eg., caevesnptestdemo) create a container named (eg.,caevesstorage).
Steps:
-
Navigate to Storage Account → Containers →+ Container.
-
Container Name: caevesstorage
-
Public access level: Private (no anonymous access)
-
Click Create

3.3 Verify Access
Before deploying CAEVES manually, ensure:
-
The container caevesstorage exists in the storage account caevesnptestdemo.
-
Once verified, proceed to Manual On-Premises Deployment.
4. Manual On-Premises Deployment of CAEVES
To Install and Configure CAEVES instance refer KB Article: How to Deploy CAEVES Manually?
Deployment Complete – CAEVES is now running in your On-Premises environment.