
You will need to install and configure the following:
1. System Requirements
- Install a Windows 2025/2022 Server Standard or Datacenter Desktop Experience
2. Storage Requirements
- Provision a data disk with the following configuration
- Disk 1(Fixed Disk) – Snapshots + Metadata(1 TB)
-
Snapshots = 90% of total volume (no drive letter)
-
Metadata = 10% of total volume (assigned drive letter F:)
- Disk 2(Slider Disk) – Cache (128 GB – 8 TB)
- 100% → Cache (assigned drive letter G:)
-
Important: For every 100 million objects, the metadata volume should have 120 GiB of space. Adjust size proportionally if storing more objects.

- Note: Ensure the disk is initialized and partitioned accordingly before installation.
3. Required Software Components
Before installing CAEVES, download and install the following software components:
3.1 Download and Install Required Runtimes
- ASP.NET Core Runtime 8.0.26 - Click Here
- .NET Desktop Runtime 8.0.26 - Click Here
- .NET Runtime 8.0.26 - Click Here
- Microsoft Visual C++ Redistributable - Click Here
3.2 Verify Installation
Open Command Prompt and run: dotnet --list-runtimes
Run this command to list installed Visual C++ Redistributable:
wmic product get name,version | findstr "Visual C++"
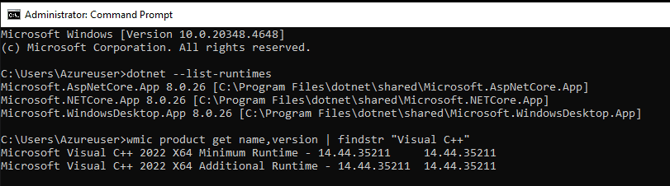
Ensure all runtimes are installed successfully before launching the CAEVES installer.
4. Configure Azure Environment Variables
CAEVES requires Azure authentication parameters to be provided as environment variables
4.1 Environment Variables to Configure
Steps to Set Environment Variables
-
Open Start Menu → Windows System → Control Panel
-
Navigate to System and Security → System
-
Click Advanced system settings
-
In the System Properties window, click Environment Variables
-
Under System variables, click New
- Add each of the following:
| Variable Name | Value(Example) | Description |
|---|---|---|
| AZURE_TENANT_ID | <your-tenant-id> | The Azure Active Directory (AAD) tenant ID where the app is registered. |
| AZURE_CLIENT_ID | <your-client-id> | The Application (client) ID of your App Registration in Azure AD. |
| AZURE_CLIENT_SECRET | <your-client-secret> | The secret key used by your app to authenticate with Azure AD. |
| DOTNET_ENVIRONMENT | <Development> | Specifies the runtime environment for the .NET app (Development, Staging, Production). |

- Click OK to save each variable.
- Reboot the server to ensure the environment variables are fully applied.
4.3 Verification Command
After reboot, run:
echo AZURE_TENANT_ID=%AZURE_TENANT_ID%echo AZURE_CLIENT_ID=%AZURE_CLIENT_ID%echo AZURE_CLIENT_SECRET=%AZURE_CLIENT_SECRET%echo DOTNET_ENVIRONMENT=%DOTNET_ENVIRONMENT%

Each command should return the appropriate value.
5. Azure Storage Configuration for CAEVES
Before installing CAEVES, you must configure Azure Storage. This includes creating a storage account, containers, and tables for snapshots and metadata. Follow these steps:
5.1 Create an Azure Storage Account
-
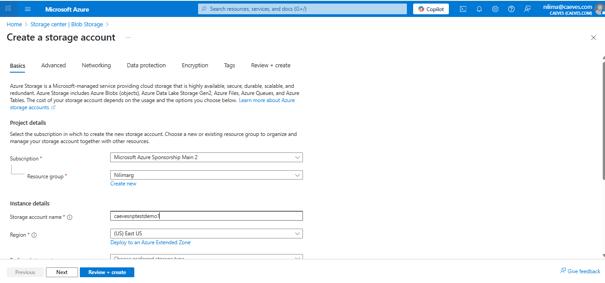
Go to the Azure Portal.
-
Navigate to Storage Accounts → + Create.
-
Basics Tab:
-
Fill in the required details:
-
Subscription: Select your subscription.
-
Resource Group: Create or select an existing one.
-
Storage Account Name: Unique name for the storage account.
-
Region: Choose the appropriate region.
-
Performance: Standard (default) is usually sufficient.
-
Replication: Choose based on your redundancy needs (e.g., LRS, GRS).
- Click Next: Advanced
-
Advanced Tab
-
Configure additional features as required:
-
Security options (e.g., enable hierarchical namespace if using Data Lake Storage)
-
Blob access tier default (Hot, Cool)
-
Enable/disable large file shares if needed
-
-
Click Next: Networking
-
-
Networking Tab
-
-
Connectivity method:
-
Public endpoint (default) or Private endpoint
-
-
Firewall and virtual networks:
-
Allow access from selected networks only, if needed
-
-
Click Next: Data Protection
-
-
-
Data Protection Tab
Configure recovery and retention options:-
-
-
Soft delete for blobs (recommended)
-
Point-in-time restore (if required)
-
Soft delete for containers
-
Versioning for blobs
-
Click Next: Encryption
-
-
-
-
Encryption Tab
-
Encryption is enabled by default (Microsoft-managed keys(MMK))
-
Optionally, select Customer-managed keys (CMK) if required
-
-
Tags Tab
Add key-value tags to organize resources.
-
-
Click Review + Create, then Create.


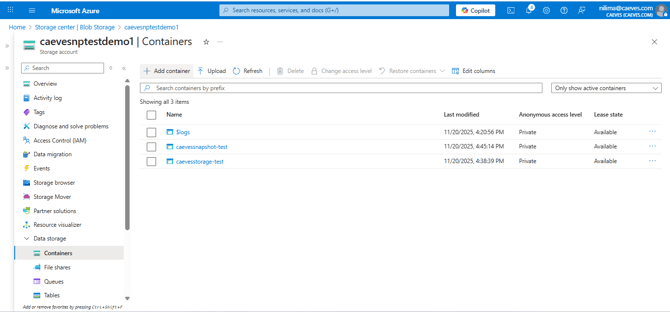
5.2 Create Blob Containers
a. Data Container
-
Purpose: Container for general data storage used by CAEVES.
-
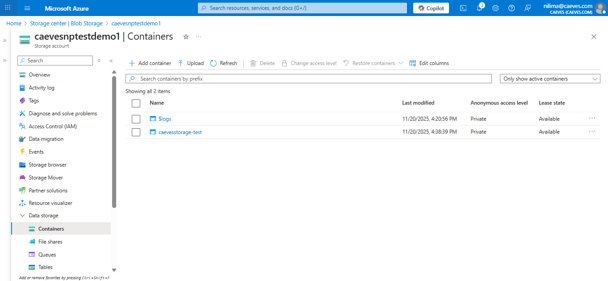
Go to the Azure Portal and open your Storage Account (the one you created in Step 5.1).
- In the left-hand menu, click Containers under the Data storage section.
- Click + Container at the top.
-
Enter the Name of the container: caevesstorage-test (example)
-
Set Public access level to Private.

-
Click Create.
- Wait for the container creation to complete — it will appear in the list of containers once ready.
-
b. Snapshots Container
-
Purpose: Container for general data storage used by CAEVES.
-
Go to the Azure Portal and open your Storage Account (the one you created in Step 5.1).
- In the left-hand menu, click Containers under the Data storage section.
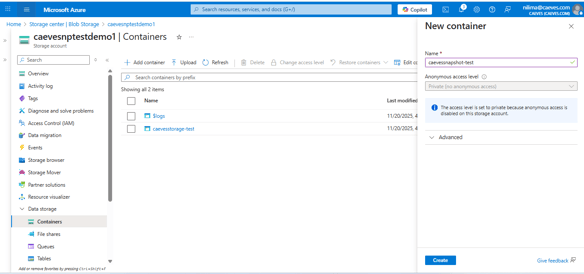
- Click + Container at the top.
-
Enter the Name of the container: caevessnapshot-test (example)
-
Set Public access level to Private.
-
Click Create.
- Wait for the container creation to complete — it will appear in the list of containers once ready.
-
5.3 Create Tables
a. Metadata Table
-
Purpose: Store metadata for CAEVES operations.
-
Open the storage account → Tables → + Table.
-
Name: caevesmetadatatest(example)

-
Click Ok.

-
b. Metadata Queue Table
-
Purpose: Queue/table for metadata operations.
-
Open the storage account → Tables → + Table.
-
Name: metadataqueuetable(example)
-
Click Ok.

-
c. CAEVES Config Table
-
Purpose: Store CAEVES configuration data.
-
Open the storage account → Tables → + Table.
-
Name: caevesconfigtest(example)
-
Click Ok.

-
6.Proceed with CAEVES Installation
To Install and Configure CAEVES instance refer KB Article: How to Deploy CAEVES Manually?
7. VSS Shadow Copy Configuration
7.1 Identify the Snapshot Volume
-
Right-click the Snapshot Volume → select Properties.
-
Go to the Security tab
-
Look for the Volume ID
The format usually looks like:
\\?\Volume{XXXXXXXX-XXXX-XXXX-XXXX-XXXXXXXXXXXX}\ - Note down this Volume ID — you will need it later when configuring VSS.
-png.png?width=360&height=521&name=image%20(1)-png.png)
7.2 Open Shadow Copies Settings
-
Right-click on your metadata volume (e.g., F:) in File Explorer.
-
Select Properties.
-
Go to the Shadow Copies tab.
-
In the Shadow Copies tab, locate your metadata volume (e.g., F:).
-
Select it and click Settings.
-png.png?width=361&height=520&name=image%20(2)-png.png)
7.3 Configure Shadow Copy Storage
-
In the Settings window, select the Snapshot Volume where you want to store the shadow copies.
-
Point the F:\ drive to the Snapshot Volume.
-
Adjust the maximum size for shadow copies or leave it as unlimited.
-
Click OK to save the configuration.
-png.png?width=386&height=409&name=image%20(3)-png.png)
Start CAEVES Services
Run PowerShell command: Start-Service FileCloudGatewayService
